
This is the first deep-dive post in our series, “Introducing Microsoft Cognitive Services.”

End users understand how to use bots intuitively because they’ve been using the bot’s main user interface for over 20 years. We interact with bots via a familiar instant messaging / chat-style interface and as such, we often call a bot a “chatbot.” The difference, of course, is that the user’s chatting with an intelligent application rather than a person.
Microsoft provides a framework that helps us build bots by providing the following tools:
- Bot Framework Emulator (a generic bot test client).
- Infrastructure services to host them.
- A development framework and tooling to build them, including our choice of programming language.
This is collectively called the Microsoft Bot Framework.

Let’s dig into each.
Bot Test Client
This is an executable that you download from GitHub (more on the GitHub connection in a moment). You install it, enter some configuration information and connect to your bot. This is not an end-user tool Instead, developers use it to connect to and test server-side bot components that they are developing.
NOTE! There’s nothing to stop an enterprising end-user or hacker from downloading this tool and using it in ways for which you didn’t plan. The framework solves this problem for you but must follow the rules, so to speak, or you could allow cause trouble for yourself.
This is what the Bot Emulator looked like in October 2018:
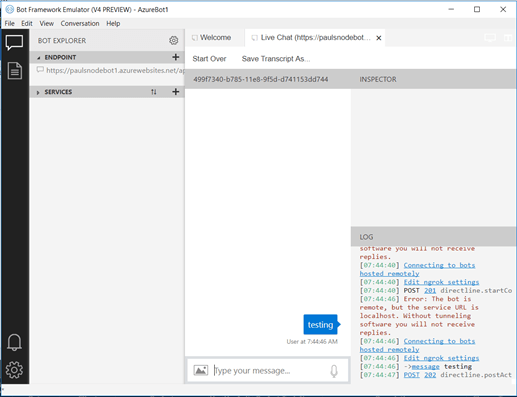
The Bot Emulator is frequently updated and may look different by the time you download and use it.
The emulator allows you to create multiple profiles (think multiple bot projects). It provides a rudimentary chat interface for chatting with your bot. And lastly, it shows you a very detailed log of the underlying communication between the emulator and your bot’s code.
As mentioned above, you download the emulator from GitHub. Microsoft has embraced open source in recent years, both in terms of tools (like Gulp, React) as well as putting more and more of their own code upon public repositories like GitHub. I’ve taken advantage of this by looking at the emulator’s code to help understand and debug my own bot code and you can too.
Infrastructure Services
Developers design, build and test bots on their workstations. Eventually, it’s ready for end-users and Azure provides a combination of services to host and manage them.
|
|
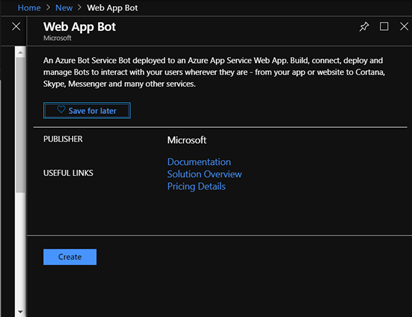
Creating and Managing a Web App Bot resource in Azure
This becomes the public endpoint for your bot to which your bot clients connect. Microsoft provides some starter bot templates here and supports a fully automated continuous integration (CI) DevOps experience.
For those of you already familiar with Azure app services – Azure pairs each web app bot with its own app service. This means that all the things you’re used to doing with app services apply to web app bots as well, including, for instance, managing security and things like CORS.
Development Framework
Microsoft provides first-class tooling and support for two development approaches:
- JavaScript and Node using VS Code
- C# using Microsoft Visual Studio
This article focuses on JS/Node.
Unlike some of the other tools under the Cognitive Services umbrella, Bots can be developed locally and deployed later to a server. Some of the services, like speech recognition, must use Azure for development and production, not just production.
Here’s a diagram showing that shows how it all hangs together:
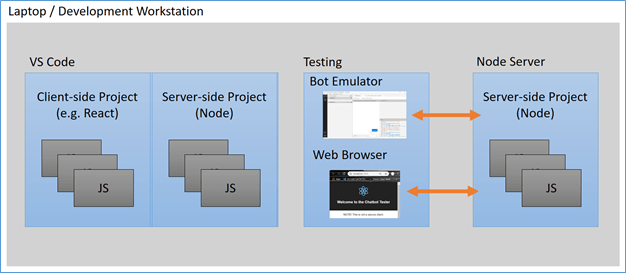
The diagram shows a typical developer setup when working with the bot framework:
- Use Visual Studio Code to write the client-side and server-side code
- Deploy the code to a locally running Node server (with “hot reload” for a fun and efficient developer workflow)
-
Test your server-side code with:
- Bot Emulator to get detailed diagnostics and an easy ready-to-use tool
- Your own client-side interface is written in React or your favorite client-side framework
Note that everything is developed, tested and deployed on a single workstation. There is no need to provision and manage a separate server.
Developing Bots
As mentioned above, Microsoft has embraced many of the common tools used today by the community at large. These include:
- Node: JavaScript on the server.
- Gulp: A JavaScript task runner often used to automate build tasks.
- Yo: A scaffolding framework – create an initial bit of code according to best practices from which you start your actual work.
- Webpack: An optimization tool that also simplifies deployment by “packing” assets into the least number of required physical files.
- VS Code: Light-weight code editor that provides excellent tooling for building JavaScript and Node solutions.
- TypeScript: A strong typed version of JavaScript.
It might seem like a lot and it is! However, if this is new to you, take comfort in these two key facts:
- This is actually very normal. The JavaScript/Node world has been using tools like these for quite some time. It’s not a Microsoft “thing” – it’s a robust suite of tools built over time and ratified by a large portion of the development community.
- These tools aim to simplify the process, believe it or not. And – they do! You’ll have to take my word for it now, but you’ll find over time that these apps make it very easy to get up to speed quickly with developing not just Bots, but many other functions – inside and outside of the realm of cognitive services.
Note that you can also use Microsoft’s flagship produce, Visual Studio (as opposed to VS Code) and C# to develop bots. This article doesn’t follow that path, but you should know it’s available and is well-supported by Microsoft.
One last note – Bots in the Azure framework provide a REST interface that allows you to communicate with them. This means that you can use any programming language to create a bot client that you, as long as that programming language allows you to consume REST endpoints.
Demo Application
You can find a demo application showing how to code up different elements of the bot framework here: [insert link].
On the front-end, The application uses the React UI framework and was initialized using the react typescript starter, which you can read about here: https://github.com/Microsoft/TypeScript-React-Starter. Here’s what it looks like:

When you run the app, it presents you with a plain user interface (with a few elements of the Material Design UI), including a “start a new chat” button. Click that and a new chatbot opens a shown on the right. This particular client-side chatbot connects to one of the starter bots Microsoft provides, the “Echo Bot” (see below for more details on this). The echo bot simply returns back whatever text you send it. Do that by typing some text into the “send:” field and press return. As it messages with the server, status messages appear in the grid below, along with elapsed time between messages.
If you want to run the application, you need to do two things: 1) Create a bot in Azure and 2) Clone/modify the demo.
Creating a Bot in Azure
This is very simple and Microsoft documents it very clearly here: https://docs.microsoft.com/en-us/azure/bot-service/bot-service-quickstart?view=azure-bot-service-4.0. This post has nothing to add to those instructions. It’s a very simple process with just a bit of pointing and clicking.
Make a note of the “secret key” for the DirectLine channel – you’ll need this next.
Running the Demo
Follow these steps to run the demo:
- Clone it from Github
- Open the project in your favorite editor (try VS Code if you haven’t done that before).
- Open app.tsx and navigate to around line 26 (this may be different depending on future updates to the demo code). Add your own “directLineAuthKey” as shown:
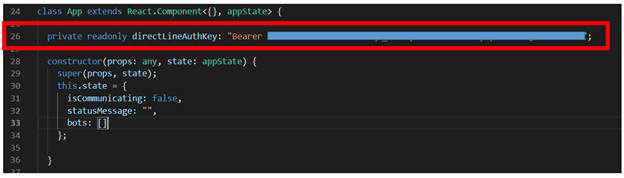
Note: It’s important to keep the word “Bearer” in there as shown.
- Using your favorite command line too, navigate to the root directory of the project you cloned.
- If this is the first time you’re using the app, run “npm install”. This will download and install quite a lot of node modules that the bot framework and React require.
- Run “npm start run”
You should be up and running at this point.
The Code
As described above, I used the react typescript starter to scaffold the project and as such, it has the usual App.tsx file to launch things. This is a light-weight component that launches the app and provides a simple UI to enable users to launch a Bot UI component.
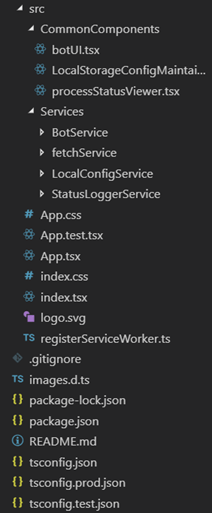
The botUI.tsx component, in CommonComponents, provides the actual user interface for the Bot itself.
There’s a LocalStorageConfigMaintainer component in the codebase. As of now, that’s incomplete and not part of the actual bot framework itself, so you don’t need to worry about it.
The processStatusViewer component shows log messages as generated by the component and services described below. This lets us log details of the underlying chat function and show some elapsed times.
The Services folder contains some helper services as well as the most interesting logic. That’s covered shortly.
The BotService itself handles the higher level messages between the bot UI component and Azure.
The LocalConfigService isn’t relevant but in case you’re curious, it supports the LocalStorageConfigMaintainer component.
fetchSevice is a lower-level service that uses the browser’s fetch API to do actual I/O with Azure and is leverages by the BotService.
Lastly, the StatusLoggerService enables components and other services to log status messages that can ultimately present on the UI via the processStatusViewer component.
Starting a Conversation
When the Bot UI component starts up, its componentDidMount method initializes a new service, DirectLineService. This service is in the BotService itself and is tied to one of the “channels” Azure provides for us to communicate with the bot code we’re hosting in Azure.
public
async
componentDidMount() {
this.myDirectlineService = new
DirectLineService(
{ authorizationKey:
this.props.authorizationKey });
this.setState({ isChatting:
true });
const
startResult = await
this.myDirectlineService.startConversation()
this.myConversationID = startResult.conversationId;
const
connection = new
WebSocket(startResult.streamUrl);
connection.onmessage = (ev) => {
if (ev.data.length > 0) {
this.handleServerResponse({ serverResponse:
ev });
}
};
this.setState({ conversationID:
startResult.conversationId, isChatting:
false });
}
The key takeaway from the snippet is that we start a “conversation” with the bot hosted in Azure. When we start a conversation, we need to pass an authorization key and if we’re accepted as valid users, Azure returns back a rich JSON response with two important pieces of data:
- conversationID for us to use going forward. This is a unique index into a pool of active conversations that Azure manages on the backend for us.
- streamUrl: this is the URL of a web socket. The Bot will send its responses to us via this socket. We don’t need to use the socket – we can also poll the bot periodically via REST – but this is the best option for a real-time response. You can dig around in the directLineService.ts code for an example of this.
The handleServerResponse() method looks like this:
private
handleServerResponse(args: { serverResponse: MessageEvent }) {
const
msgDetails = JSON.parse(args.serverResponse.data) as
dlReadActivityResponse;
if (this.isFinalResponse({forMsg:
msgDetails})) {
this.setState(
{
lastResponse:
msgDetails.activities[msgDetails.activities.length – 1].text,
isChatting:
false
}
);
this.forceUpdate();
}
handleServerResponse shows a couple of key points:
- The “meat” of the response is stringified JSON and it stored in field data.
- The server actually sends multiple responses each time you connect to it. Sometimes, the message is actually blank – kind of like a “ping”. Sometimes, it’s more of a status message. This bit of code, “isFinalResponse” simply applies some rules to determine if we got the “final” response to our connect request.
Closing the Loop – Sending Messages
We send data to the bot via REST. The endpoint is in the format of:
By looking at that URL, you can tell two things:
- Your bot doesn’t have a unique server endpoint – “direct line” bots all communicate with direcltine.botframework.com.
- You need that conversationId value that you got when you started the conversation.
When sending messages, you post to that end point and the post will look like this in JavaScript terms:
private
sendToBotServer<T>(
args: {endPoint: string, payLoad?: any} = {endPoint:
“”, payLoad:
null}): Promise<T> {
const
result = new
Promise<T>(async (resolve, reject) => {
try {
const
fetchResponse = await
new
FetchService().postData(
{
toUrl:
args.endPoint,
authorizationKey:
this.serviceParams.authorizationKey,
data:
args.payLoad
});
resolve(await
fetchResponse.json());
}
catch (err) {
const
errorDetails = {
from:
“directLineService.ts: sendToBotServer”,
args:
args,
errorDetails:
err
};
console.error(errorDetails);
reject(errorDetails);
}
});
return
result;
}
As you can see from the above snippet.
The Bot listens on that end point, accepts the input, processes it and sends back a response on the web socket you got when you initiated the conversation.
Summary
This article shows the overall process flow between a bot client and a bot running in Azure.
You initiate a conversation with the server by posting a “start conversation” message to the bot.
It responds with a conversation ID as well as a socket on which you listen for responses.
Going forward, you use the same conversation ID on all subsequent messages you send from the client to the server.
The Bot server is pretty chatty, so you need to process the multiple messages it sends back to you and extract only the ones you want.


