
Ok, ok, I’ve done a few blog posts on Teams.
https://wardpeter.com/displaying-list-data-in-a-team-tab/
https://wardpeter.com/working-with-spfx-teams-tab/
These are worth a read before you read this blog post, as there’s a knowledge build up and I’m not repeating myself.
This blog post explains how to access external data source. This one in particular- https://calendarific.com/api-documentation
 Everything is in Github : https://github.com/peterwardsoho/SPFX-Teams-Tab-With-External-API-Integration
Other Github repositories – https://github.com/peterwardsoho
I’ve broken it down into sections:
Initial Setup of SPFx Project for Teams Tab
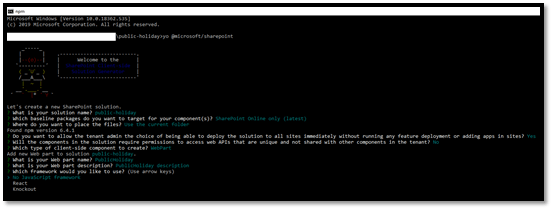
Follow the given steps to setup SPFx project for Teams tab as below:
- Create a new project directory in your favorite location.
-
md public holiday
-
cd public-holiday
-
yo @microsoft/sharepoint
-
App Name: Hit Enter to have a default name ( public holiday in this case) or type in any other name for your solution.
-
Target SharePoint: SharePoint Online only (Yes, I know this is for Teams, but remember the backend for Teams is SharePoint… so makes sense)
-
Place of files: We may choose to use the same folder
-
Deployment option: Selecting ‘Y’ will allow the app to be deployed instantly to all sites and will be accessible everywhere.
-
Permissions to access web APIs: Select if the components in the solution require permissions to access web APIs that are unique and not shared with other components in the tenant. Select (N)
-
Type of client-side component to create: We can choose to create a client-side web part or an extension. Selected WebPart
-
Web Part Name:
PublicHoliday -
Web part description: Enter the description but it is not mandatory.
-
Framework to use: Select No JavaScript Framework
-
At this point, Yeoman installs the required dependencies and scaffolds the solution files. Creation of the solution might take a few minutes. Yeoman scaffolds the project to include your PublicHoliday web part as well.
-
Next, open the Public Holiday SPFx project in Visual Studio Code.
-
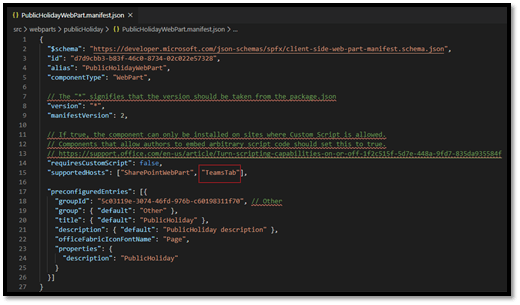
Updating the web part manifest to make it available for Microsoft Teams.
Locate the manifest json file for the web part you want to make available to Teams and modify the supportedHosts properties to include “TeamsTab” as in the following example.
- Add the below code in the webpart.ts files
- import * as microsoftTeams from “@microsoft/teams-js”;
- In a class, define a variable to store Microsoft Teams context.
- private _teamsContext: microsoftTeams.Context;
-
Add the onInit() method to set the Microsoft Teams context.
private _teamsContext: microsoftTeams.Context;
protected onInit(): Promise<any> {
let retVal: Promise<any> = Promise.resolve();
if (this.context.microsoftTeams) {
retVal = new Promise((resolve, reject) => {
this.context.microsoftTeams.getContext(context => {
this._teamsContext = context;
resolve();
});
});
}
return retVal;
}
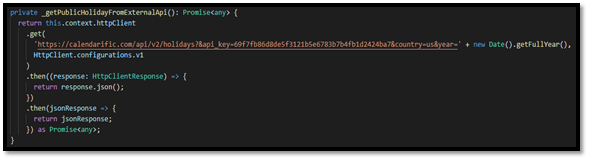
Implement External API
- Add the below code in the webpart.ts file
- import { HttpClient, HttpClientResponse } from ‘@microsoft/sp-http’;
private _getPublicHolidayFromExternalApi(): Promise<any> {
return this.context.httpClient
.get(
‘https://calendarific.com/api/v2/holidays?&api_key=69f7fb86d8de5f3121b5e6783b7b4fb1d2424ba7&country=us&year=’ + new Date().getFullYear(),
HttpClient.configurations.v1
)
.then((response: HttpClientResponse) => {
return response.json();
})
.then(jsonResponse => {
return jsonResponse;
}) as Promise<any>;
}
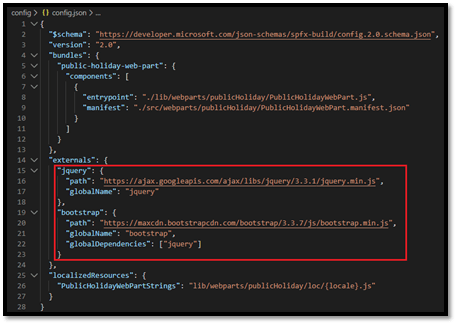
Implement jQuery, Datatable and Bootstrap for Design
- Install below npm packages.
- npm install @types/jquery@2 –save
- npm install @types/jqueryui –save
- npm install datatables.net
- npm install datatables.net-jqui
-
npm install –save @types/datatables.net
-
Navigate to Config.json file under Config Folder. ( Config > Config.json) and add the below code in external node.
“jquery”: {
“path”: “https://ajax.googleapis.com/ajax/libs/jquery/3.3.1/jquery.min.js”,
“globalName”: “jquery”
},
“bootstrap”: {
“path”: “https://maxcdn.bootstrapcdn.com/bootstrap/3.3.7/js/bootstrap.min.js”,
“globalName”: “bootstrap”,
“globalDependencies”: [“jquery”]
}
- Add the below code in the webpart.ts file.
- import { SPComponentLoader } from ‘@microsoft/sp-loader’;
- import ‘jquery’;
- import ‘DataTables.net’;
- require(‘bootstrap’);
-
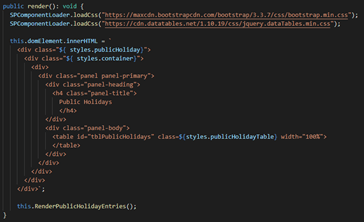
Update render() method as below.
public render(): void {
SPComponentLoader.loadCss(“https://maxcdn.bootstrapcdn.com/bootstrap/3.3.7/css/bootstrap.min.css”);
SPComponentLoader.loadCss(“https://cdn.datatables.net/1.10.19/css/jquery.dataTables.min.css”);
this.domElement.innerHTML = `
<div class=”${ styles.publicHoliday}“>
<div class=”${ styles.container}“>
<div>
<div class=”panel panel-primary”>
<div class=”panel-heading”>
<h4 class=”panel-title”>
Public Holidays
</h4>
</div>
<div class=”panel-body”>
<table id=”tblPublicHolidays” class=${styles.publicHolidayTable} width=”100%”>
</table>
</div>
</div>
</div>
</div>
</div>`;
this.RenderPublicHolidayEntries();
}
-
Add the below RenderPublicHolidayEntries() method in webpart.ts file.
private RenderPublicHolidayEntries(): void {
this.context.statusRenderer.displayLoadingIndicator(document.getElementById(“tblPublicHolidays”),“Please wait…”);
var holidaysData = [];
var holidaysDataJsonArr = [];
this._getPublicHolidayFromExternalApi().then((items) => {
holidaysData = items.response.holidays;
for (var i = 0; i < holidaysData.length; i++) {
let states: any;
if (holidaysData[i].states == “All”) {
states = holidaysData[i].states;
}
else {
var statesArr = [];
for (var j = 0; j < holidaysData[i].states.length; j++) {
statesArr.push(holidaysData[i].states[j].name);
}
states = statesArr.toString();
}
holidaysDataJsonArr.push({ Holiday: holidaysData[i].name, Description: holidaysData[i].description, Date: new Date(holidaysData[i].date.iso).toLocaleDateString(), HolidayType: holidaysData[i].type.toString(), Locations: holidaysData[i].locations, States: states });
}
var jsonArray = holidaysDataJsonArr.map(function (item) {
return [
item.Holiday,
item.Description,
item.Date,
item.HolidayType,
item.Locations,
item.States
];
});
$(‘#tblPublicHolidays’).DataTable({
data: jsonArray,
columns: [
{ title: “Holiday” },
{ title: “Description” },
{ title: “Date” },
{ title: “Holiday Type” },
{ title: “Locations” },
{ title: “States” }
]
});
this.context.statusRenderer.clearLoadingIndicator(document.getElementById(“tblPublicHolidays”));
}).catch((error) => {
console.log(“Something went wrong “ + error);
this.context.statusRenderer.clearLoadingIndicator(document.getElementById(“tblPublicHolidays”));
});
}
-
Add the below style for table in WebPart.module.scss file.
.container {
width: 100%;
margin: 0px auto;
box-shadow: 0 2px 4px 0 rgba(0, 0, 0, 0.2), 0 25px 50px 0 rgba(0, 0, 0, 0.1);
border-radius: 4px;
}
/*Table style*/
.publicHolidayTable {
table-layout: fixed;
width: 100%;
}
.publicHolidayTable thead{
background-color: #337ab7;
color: #fff;
}
.publicHolidayTable th, .publicHolidayTable td{
border: 1px solid #d1cfd0;
text-align: center;
word-break: break-all;
padding: 5px;
}
.publicHolidayTable tr.table-heading{
background-color: #337ab7;
font-size: 18px;
font-weight: bold;
}
.publicHolidayTable .table-links{
color: #058ac8;
}
.publicHolidayTable .table-links:hover{
color: #5e9732;
}
/*Table style*/
Deployment Process
- Bundle the solution run gulp bundle –ship.
- Package the solution run gulp package-solution –ship
- Navigate to the solution and copy public-holiday.sppkg file from SharePoint folder.
-
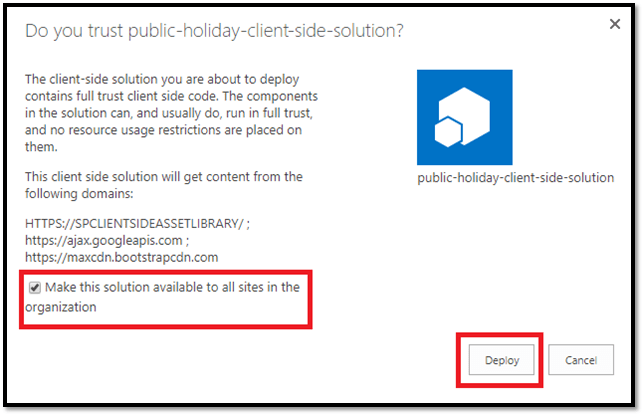
Add this public-holiday.sppkg into the Appcatlog of your tenant.
Use the App Catalog to make custom business apps available for your SharePoint Online environment.
-
Make sure you Check “ Make this solution available to all sites in the organization” option and click on “ Deploy“.
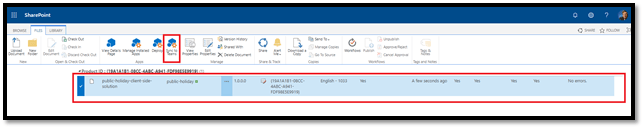
- Once you deploy this public-holiday.sppkg file.
-
Click “ Sync to Teams” in files tab from the ribbon as shown below.
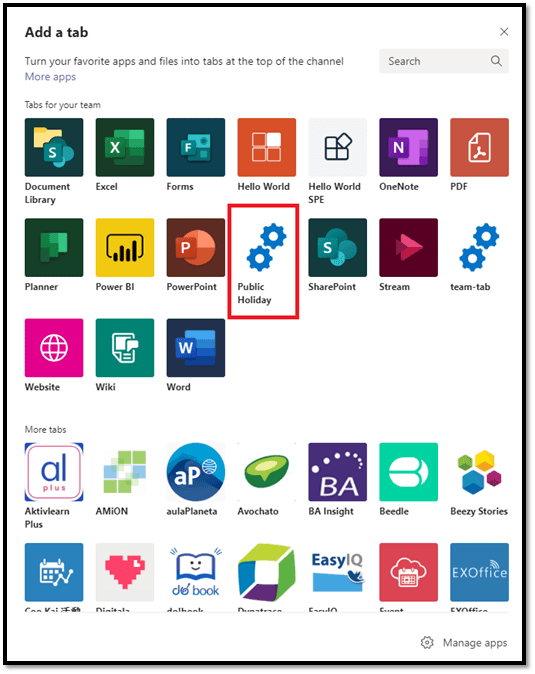
- Once it has done open your MS Teams and navigate to the team where you wanted to add this teams tab.
-
Click on the + icon and a dialog will open with Add a tab title.

-
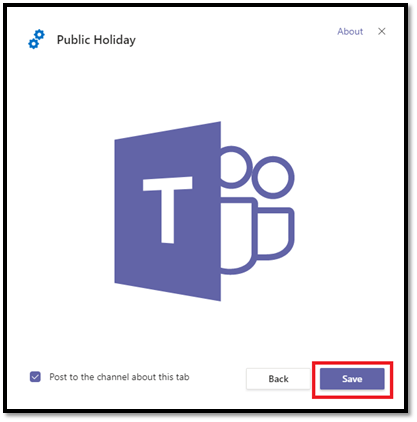
Select the Public Holiday WebPart with your title from the list of app has and click it. It will open a new dialog box as shown below and click Save to add it.
- Final output of Public Holiday teams tab will be as below.
 Everything is in Github : https://github.com/peterwardsoho/SPFX-Teams-Tab-With-External-API-Integration

